Placing trades
The order ticket, why every order needs a stop, the reasons an order is refused, managing the open position, moving its levels on the chart, and the fees charged.
Orders are placed from the Ticket tab of the paper-trading panel, during a bar replay. Read the overview first for which panel decides the fills and how.
The ticket
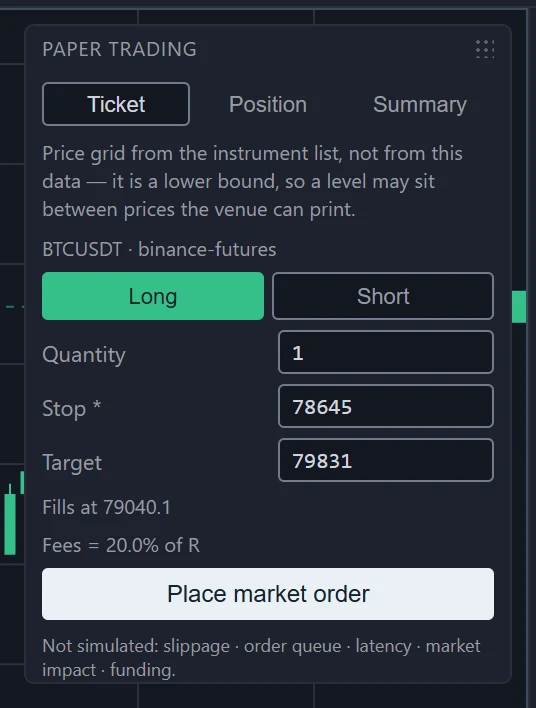
| Field | What it takes |
|---|---|
| Long / Short | The direction. A long profits when price rises, a short when it falls. |
| Quantity | The size, in units of the symbol — 0.5 on BTCUSDT is half a bitcoin. |
| Stop * | The price that closes the trade at a loss. Required. |
| Target | The price that closes the trade at a profit. Leave it empty for no target. |
Under the fields, the line Fills at … gives the entry price — the close of the newest bar the matching panel has revealed — and a second line gives the fees as a share of R (see Fees). The entry price comes from the matching panel, not from the finest panel on screen: matched on 1h, it is the close of the last complete hour, which can be some way from the price a 1m panel shows.
Place market order opens the position straight away, at that entry price. There are no limit or stop entries, and only one position can be open at a time.
Filled in for you
Each time the tab opens, the ticket starts with a quantity of 1, a stop half a percent from the entry price on the losing side and a target one percent away on the winning side — a target at twice the risk. Switching between Long and Short fills the stop and target in again for the new side, unless you have typed in them.
The fields do not follow price while the tab stays open. Check the stop and target before each order.
When you leave a stop or target field, its price is moved onto the symbol's price grid, to the nearest price the market can trade at. The number you see is the level the fill is checked against.
Why a stop is required
Every result in paper trading is measured in R: the distance from the entry to the stop, times the quantity — what the trade stood to lose when you placed it. A trade that ends at the stop is about −1R before fees; one that makes twice that distance is +2R. R makes trades of different sizes and on different symbols comparable, and without a stop there is no R, so the ticket does not take an order without one.
R is fixed when the position opens. Moving the stop later changes where the trade can end, not the size of R. A stop moved onto the entry price — break-even — is accepted, since R is already fixed; a stop moved beyond the entry is refused, so a trade cannot lock in a profit by moving its stop. The entry price is the close a bar printed and can sit between two prices of the grid, while a stop always sits on the grid, so break-even is the grid price nearest the entry — which may be a fraction of a tick past it. A new order's stop cannot be at the entry, because that is where R is measured from.
When an order is refused
With no matching panel, or while matching is stopped, Place market order is switched off, the note at the top of the panel gives the reason, and a line under the button points to it. Otherwise, a refused order leaves one of these under the button:
| Message | Cause |
|---|---|
| A stop is required: without one there is no R. | The stop field is empty. |
| The stop cannot equal the entry — R would be zero. | The stop is at the entry price. |
| The stop is on the wrong side of the entry. | A long's stop is above the entry, or a short's below it. |
| The target is on the wrong side of the entry. | A long's target is at or below the entry, or a short's at or above it. |
| Quantity must be above zero. | The quantity is empty, zero or negative. |
| Quantity is too large — at most one billion. | The quantity is above one billion units. |
| A position is already open. | Close the open position first. |
| No bar has been revealed yet. | The matching panel has not revealed a bar to take a price from yet. |
| This panel has no price grid — a level cannot be placed on it. | The matching panel has no price grid yet, so the stop cannot be placed on one. |
The open position
The Position tab shows the open position — its side, quantity and entry price, its stop and target, and how far it has gone against you (MAE) and in your favour (MFE) so far, both in R. With nothing open it says No open position.
- Close at market closes the position at the close of the newest bar the matching panel has revealed, with the time of that bar. It is recorded as a manual exit.
- Cancel target removes the target, leaving the stop as the only way out besides closing by hand. Once removed, the target cannot be put back on that trade. The stop cannot be removed.
A position held for more than 8 hours of replayed time adds Held over 8 market hours — funding is not simulated. The warning is hidden while matching is stopped.
Closing by hand needs no price grid and works while matching is stopped: the price is then the close of the last bar the matching panel revealed before it stopped, and the trade's row carries the badge stopped. It is refused only when no panel has ever matched, with the reason under the buttons.
Levels on the chart
While a position is open, every candles and footprint panel showing its symbol draws three lines across the plot, each with a chip at the left edge giving its price:
- E — the entry, dashed. It cannot be moved.
- SL — the stop, in the chart's down colour.
- TP — the target, in the chart's up colour, when there is one.
Heatmap panels show them too while the panel is on the replay clock — the same past the matcher fills against.
Drag SL or TP to move the stop or the target. Point at the line and it thickens; press and drag, and the level moves along the price grid. It is set when you let go. A move that would break a rule above — a stop dragged past the entry, say — is refused with the same message, and the line goes back. While matching is stopped, a drag is refused with
Matching is suspended — see the note above.
A stop dragged past the current price, but not past the entry, is accepted, and the next bar decides it: if that bar opens past the stop, it fills at the open with the gap badge; if it opens on the other side and then trades through the stop, it fills at the stop, exact.
A level outside the price range on screen waits at the top or bottom edge of the plot, dashed, with an arrow on its chip pointing towards its price. It can be grabbed there and pulled back into view.
While a position is open, each level claims a band a little over a dozen pixels tall — wider on a touch screen — across the whole plot. Pressing inside that band grabs the level before anything else: a drawing, an alert line, or dragging the chart to pan starts only outside it.
When it fills
When a bar reaches the stop or the target, the position closes, the trade moves to the journal, and a line at the foot of
the panel gives the last fill — filled stop at 64010, for example. The line goes away when you place the next order,
close a position by hand or pick a new mark, so it only ever describes the trade that just ended. See
How a fill is decided for the rules, and
Journal and stats for the record.
Fees
Every trade pays a fee on each leg, as a percentage of its notional value — price times quantity:
| Leg | Fee |
|---|---|
| Entry | 0.05% |
| Exit at the stop | 0.05% |
| Exit with Close at market | 0.05% |
| Exit at the target | 0.02% |
The entry, a stop and a manual close all take liquidity from the book, as market orders do; a target rests in the book as a limit order, which exchanges usually charge less. The rates are fixed and cannot be changed.
Fees are charged on the notional value, while R is the stop distance. The tighter the stop, the more of R the fees take: with the stop 0.1% from the entry, the round trip to the stop costs about as much as R itself, so a stopped-out trade loses about 2R. With the stop 1% away, the same fees cost about a tenth of R.
The ticket shows this before you place the order, on the line Fees = …% of R: the entry fee plus the fee at the stop, as a share of R. It turns to the accent colour when that reaches a quarter of R.
Paper trading overview
Simulated trades placed during a bar replay — which panel decides the fills, how a fill is decided, what the simulation leaves out, and what is lost when you leave.
Journal and stats
The Summary tab of the paper-trading panel — the session's numbers in R, the distribution of results, the list of closed trades, and exporting the session as CSV.