Footprint overview
How a footprint panel opens each bar up by price — the bid and ask cells, the POC, the figures around each bar — and what changes as you zoom.
A footprint panel is a candle chart that shows what happened inside each bar. Every bar is split into rows by price, and every row shows how much traded there and on which side. You can see where a bar did its volume, where buyers or sellers overwhelmed the other side, and whether a move ran into selling at its high or buying at its low.
Pick Footprint in the Chart type menu. Footprint works on every symbol, on four timeframes: 1m, 5m, 15m and 1h. On a symbol TapeHawk records, scrolling back loads older bars; on a live-only symbol the panel reaches back only about half an hour and fills in live from there.
Reading one bar
With the bar zoomed wide enough, and the default settings, each row is a pair of cells either side of the candle:
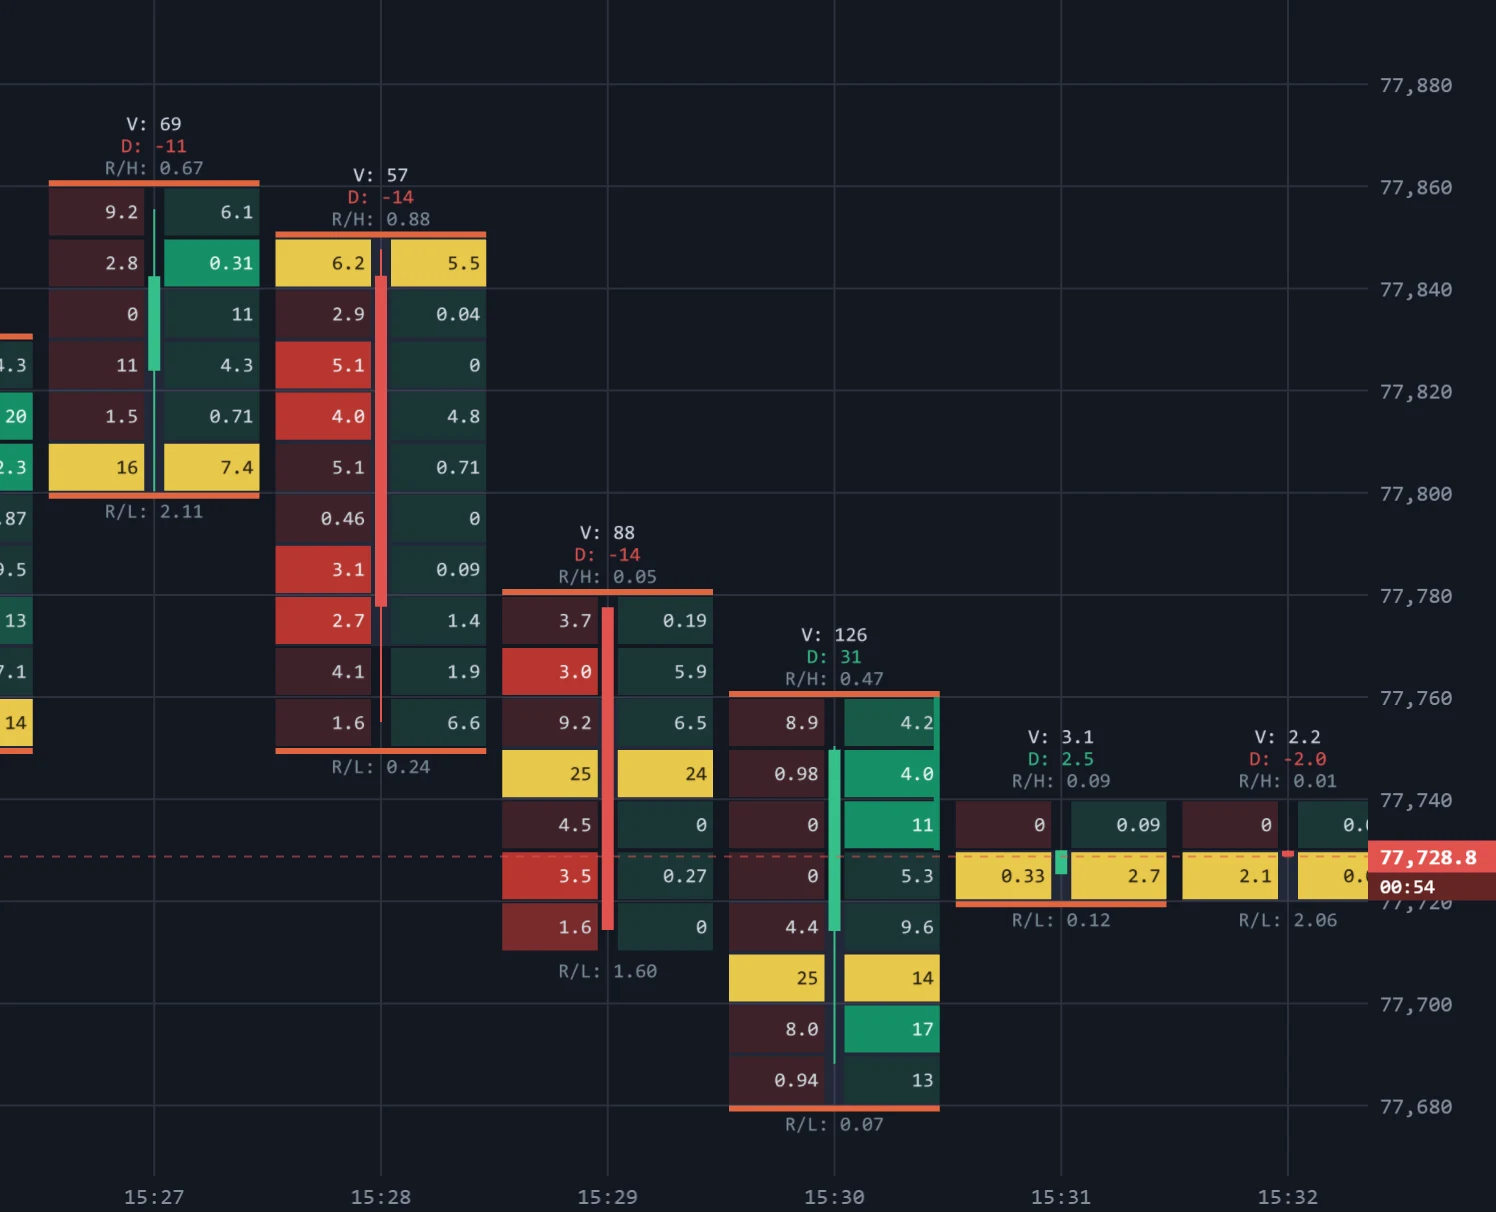
- The left cell is the volume that traded on the bid — sellers hitting resting buy orders. It is tinted red.
- The right cell is the volume that traded on the ask — buyers lifting resting sell orders. It is tinted green.
- The candle runs down the middle, so the open, high, low and close stay in view.
- The POC — the point of control, the row with the most volume in the bar — is highlighted in gold.
A cell's colour gets stronger the more its side outweighed the other. The comparison is diagonal: buying at a price is compared with selling one row below it, where those orders actually met. Stacked imbalances explains the rule and its settings.
Above each bar, V: is its total volume and D: its delta — buy volume minus sell volume, in the up candle
colour when positive and the down colour when negative. Two ratios frame the bar: R/H: above it is buying
divided by selling at the bar's highest row, and R/L: below it is selling divided by buying at its lowest row
— how hard the move was pushed into its extremes. (Less than one unit on the dividing side counts as one, so
on a coin priced in thousands a ratio can simply read as the volume.)
As you zoom out
The footprint never disappears as the columns narrow; it simplifies in stages:
- Wide — bid and ask cells side by side with their figures, and the four lines of figures around the bar.
- Narrower — one cell per row, coloured by whichever side leaned harder, still with a figure, and only the delta above the bar.
- Narrowest — rows of colour with no figures, and the candle drawn more solidly on top.
Zoom in with the mouse wheel to get the figures back. Figures also need rows tall enough to hold them, and on a wide chart the oldest bars on screen drop their figures first.
These stages assume the default Cell content, Bid | Ask. With any other choice, and always on a phone, each row is one cell at every zoom and only the delta is printed above the bar.
Where the volume comes from
Footprint bars are built from the trades themselves, not from the exchange's candles, so the bar's volume is
the sum of its rows. Rows sit on the instrument's price grid — the tick, which comes from TapeHawk's data for the instrument
when it has it. When it does not, the chart works it out from the prices on screen and the info bar says so: Tk shows the tick with
inferred tick beside it. Row grouping covers how rows are
merged.
The info bar
A footprint panel's info bar adds order flow to the price: D (delta), CVD (the running total of delta),
POC, Imb (imbalanced rows out of all rows), and Tk (the tick). D and CVD read the newest bar; POC,
Imb and Tk read the rightmost bar on screen, so while you are scrolled back they describe that older bar.
The data window shows the first four with full names; the tick is under
Details.
Settings
With the footprint panel selected, Settings (⚙) shows everything under Footprint, and every setting belongs to that panel:
- Row grouping — how many price levels one row covers;
- Cells and colours — what a cell shows and how it is coloured;
- Value area and volume nodes — the value area, high and low volume levels, unfinished auctions;
- Stacked imbalances — the imbalance ratio, stacked runs and dust;
- Statistics grid — a table of per-bar figures under the chart.