Big Trades
A mark on the heatmap wherever a single trade printed large enough to be somebody's decision rather than the tail of a stream of small ones.
One execution large enough to be somebody's decision rather than the tail of a stream of small ones. It marks a single print, not a burst: Sweeps answers the neighbouring question of size pushed through several price levels in one motion, and measured over a day of tape about half of what this draws is a trade Sweeps does not.
- Heatmap
- any range
- Alerts
- yes
What it shows
A circle on the heatmap wherever one trade printed above the size you set. Not a burst, not a motion — one execution. The plate prints what it was worth in the quote currency.
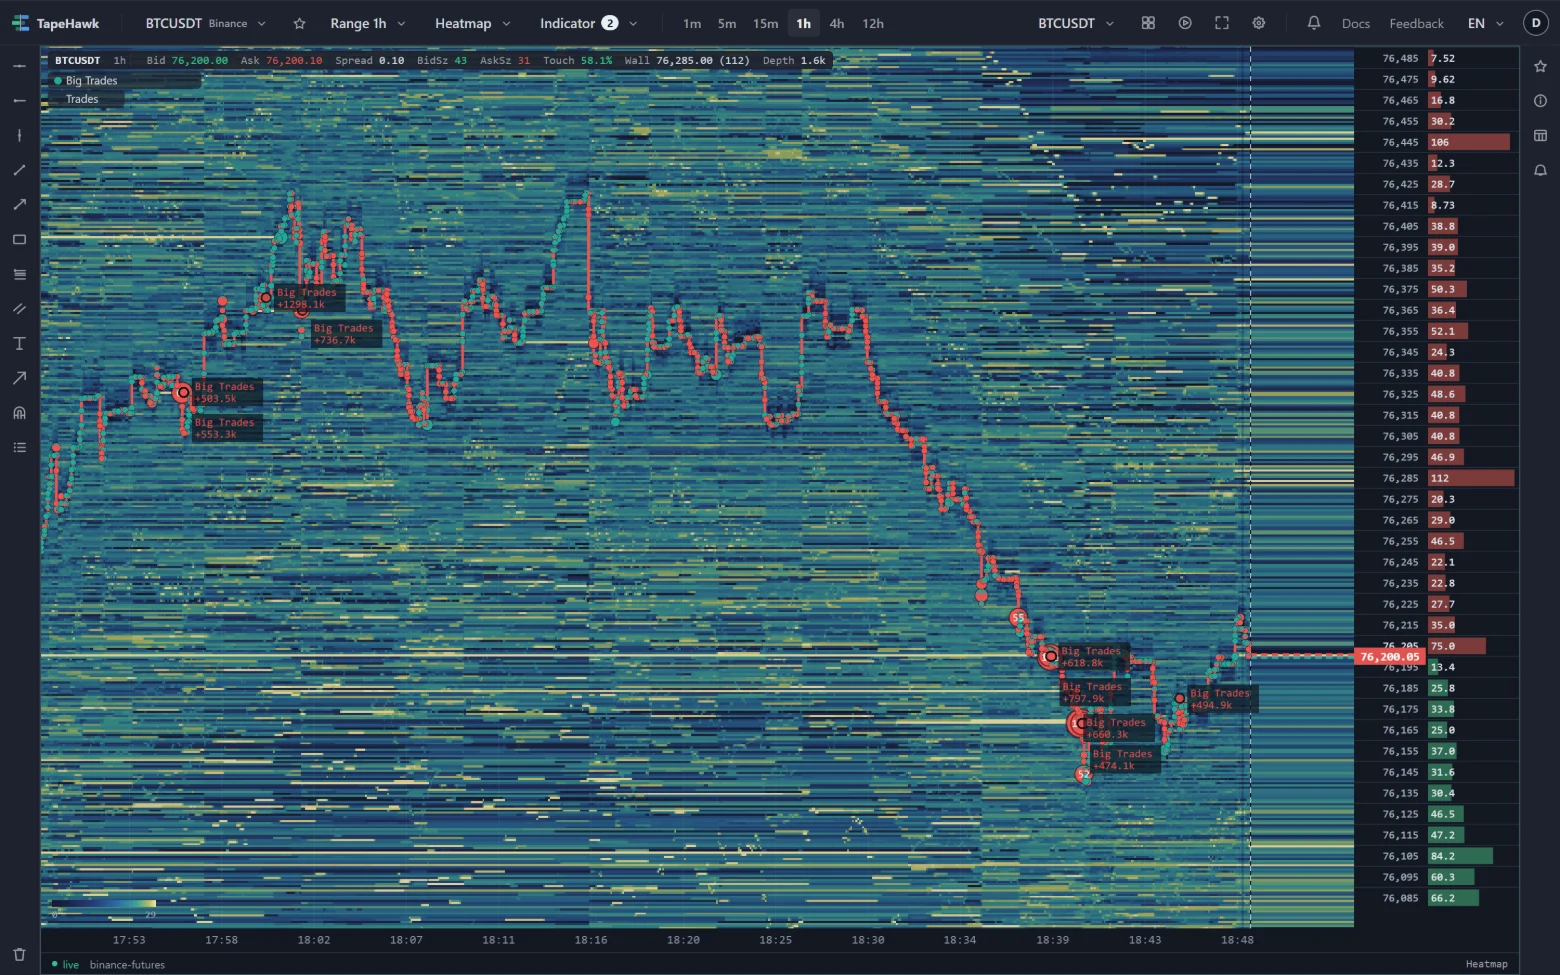
The circle is placed at the price that trade happened at, which is the only price it has. It is drawn in the buying colour when a buyer paid the offer and the selling colour when a seller hit the bid, and its size grows with the amount — the same sizing every mark and every trade bubble on the panel uses, so a big circle here is big for the same reason a big bubble is. Figures, tooltip, held marks and history work as for every mark on the heatmap.
The shape is a circle rather than an arrow on purpose: what this indicator found is a size, and the side is a property of it rather than a direction it predicts. Sweeps points, because a sweep is a motion.
How to read it
- One decision, not an accumulation. A hundred small trades and one large one can add up to the same volume, and they are not the same event. This is the second of those.
- Beside a sweep, not instead of it. A sweep is size pushed through several price levels in one motion; this is one fill. Measured over a day of tape, about half of what this marks is a trade Sweeps does not, and about half of what Sweeps marks contains no single trade this large. Turning both on is how you tell a lone block from a push.
- Where it lands is worth as much as that it happened: a large trade into a bright band on the heatmap met resting size; one in thin liquidity had the level to itself.
- Clusters of circles at one price are several participants deciding at the same level, which is a different thing from one participant walking the book.
Parameters
| Setting | Control | What it does |
|---|---|---|
| Minimum trade size ($) | Number | Range and default are set by TapeHawk; the settings dialog shows them. |
| Maximum trade size ($) | Number | Range and default are set by TapeHawk; the settings dialog shows them. |
| Max marks / minute | Number | At most this many marks in any one minute, so a burst stays readable — and the same number is the ceiling on how often an alert rule on this signal may reach you. A rule takes this default and keeps it: turning the knob on a panel changes the drawing only, because this is a display setting and a rule inherits only what changes the numbers. 1–30 · default 5 |
| Buying colour | Colour | |
| Selling colour | Colour |
Minimum trade size ($) is how large a single trade has to be before it is marked, in the quote currency. It is an amount of money rather than a number of coins so that one setting means the same thing on an expensive symbol and a cheap one. It is an absolute amount and its default is set for BTCUSDT: on a smaller symbol lower it, or almost nothing will mark. Measured over a day of tape, the value that picks out roughly the largest fifteen trades an hour is around $450,000 on Binance BTCUSDT and around $21,000 on BNBUSDT — a twenty-fold difference between two symbols on one exchange.
Maximum trade size ($) can optionally ignore trades above a size, to single out a band of sizes rather than everything above the floor; left at its lowest it ignores none.
Max marks / minute is at most how many circles may be drawn in any one minute, so a busy stretch stays readable.
Alerts
The Alert tab has one signal, bigTrade. Switch it on and TapeHawk tells you when a
trade this size prints on this symbol, with the amount, the price and the side. The alert uses the settings on the
Parameters tab at the moment you switch it on; if you change them later, the tab offers to bring the alert along. An
alert reaches you at most as often as the default Max marks / minute allows — worth keeping in
mind here, because a run of large fills is one event to you and several marks to this rule. Alerts need a confirmed
account; Signal alerts covers the rest.
Limitations
- A trade is a fill, not an order. The exchange reports executions, and an order that ate four price levels arrives as several of them, so the amount somebody actually sent can be larger than any circle you see. The trades this marks are dominant fills — measured, the marked trade carries around half the size of the whole motion it sits in — but it is still one fill.
- The size is an absolute amount, so one setting does not fit every symbol, and the default fits BTCUSDT.
- It is drawn on heatmap panels only, so only on symbols TapeHawk records, and it reaches back 24 hours.
- It says nothing about what happens next. A large trade is evidence someone acted, not evidence they were right.
Volume Spikes
A mark on the heatmap when a burst of trading goes through — a large amount in a short window, across several price levels — pointing the way of the side that traded more.
Absorptions
A mark on the heatmap where a large amount of aggressive size piled up while price stayed pinned in a narrow band — and then the band gave way.